January can often feel like a long, bleak month with the holidays behind us and a few more months of winter ahead. However, it’s the perfect time to bring some life and color into your home with blooming paperwhite bulbs. These delicate white flowers are easy to grow indoors and can provide a touch of spring even in the dead of winter.
With minimal effort, you can enjoy the beauty and fragrance of paperwhites in just a few weeks. Whether you’re a seasoned gardener or a complete beginner, forcing paperwhite bulbs to bloom indoors is a simple and rewarding project that requires very little maintenance.
1. Choose the Right Paperwhite Bulbs for Speedy Blooms
When choosing paperwhite bulbs, opt for the healthiest and largest ones you can find. Larger bulbs generally produce more substantial flower clusters and take less time to bloom. Look for firm, plump bulbs with no signs of mold or damage. If possible, purchase pre-chilled bulbs, which are often available in garden centers during the fall and winter months, as these bulbs have already gone through a dormancy period and are ready to grow.
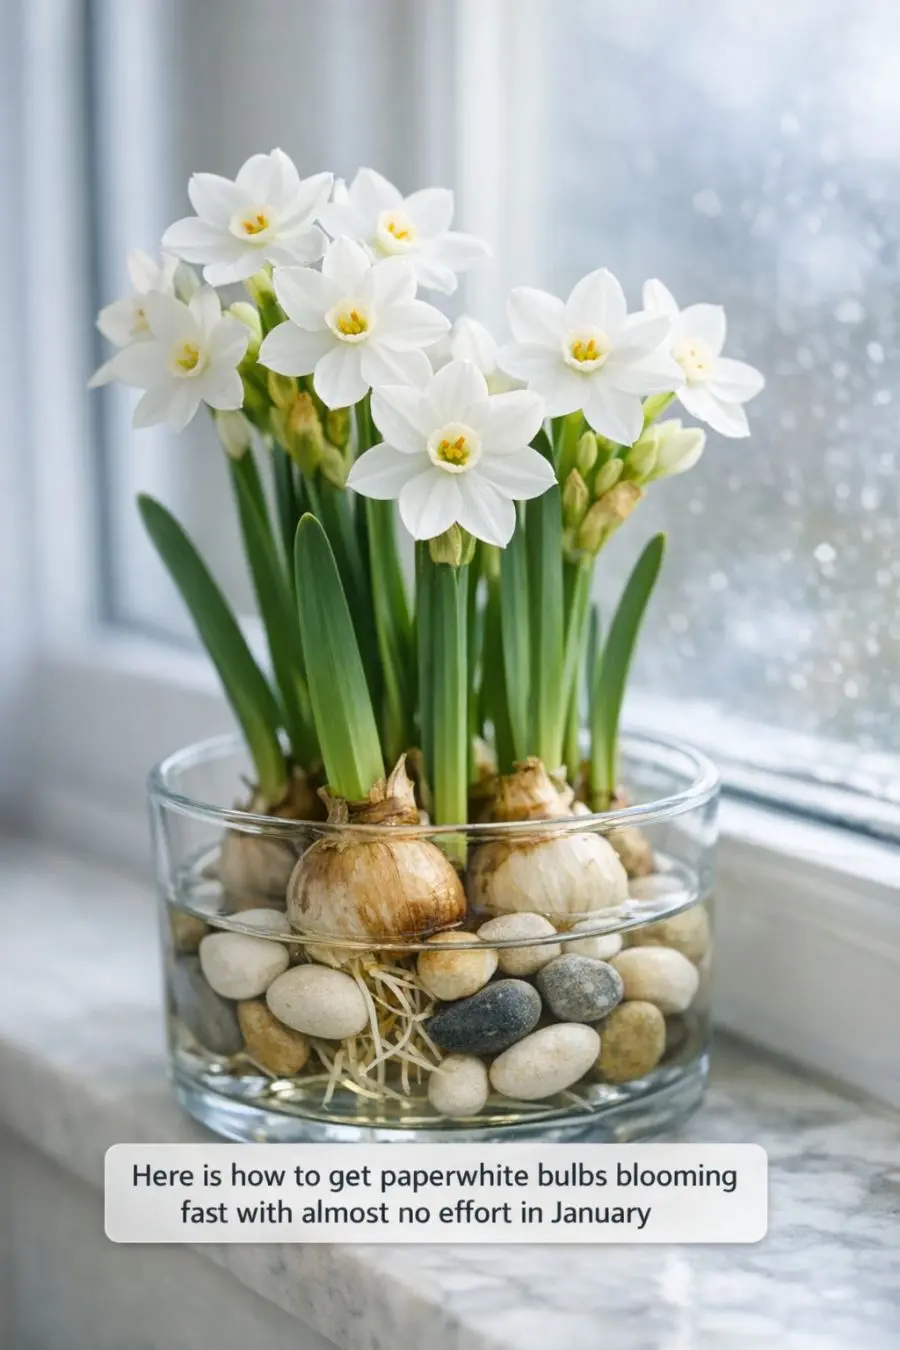
2. Use the Easiest Containers You Already Own
You don’t need fancy pots to grow paperwhites. Any shallow container that can hold pebbles or stones and a small amount of water will work. Glass containers are particularly popular, as they allow you to see the roots growing, adding an extra element of interest. Ensure the container is about 3 to 4 inches deep to provide enough space for the roots to develop.
3. The No-Soil Hack: Pebbles and Water for Zero-Mess Forcing
Skip the soil and go for a mess-free method by using pebbles or decorative stones. Fill your chosen container with about 2 inches of pebbles, position the bulbs on top, and add just enough water to reach the base of the bulbs. This setup not only minimizes mess but also prevents overwatering, a common issue when using soil.
4. Set the Perfect Water Level So Bulbs Don’t Rot
To prevent your bulbs from rotting, it’s crucial to maintain the right water level. The water should just touch the base of the bulbs without submerging them. Check the water level every few days and top up as needed. Avoid letting the bulbs sit in water, as this can lead to rot and inhibit growth.
5. Pre-Chill or Not? The Simple Truth About January Forcing
Unlike many other bulbs, paperwhites do not require a chilling period to bloom. This makes them ideal for January forcing, as they can be planted and grown immediately. If you’re purchasing bulbs in January, they’re often ready to go straight into your container setup.
6. Jump-Start Growth With a Warm, Dim Corner
Place your container in a warm, dimly lit location to encourage root and shoot growth. A temperature range of 60-70°F is ideal. This initial stage can last about 1-2 weeks, during which you’ll notice the bulbs beginning to sprout.
7. Turn Up the Light at the Right Time for Faster Flowers
Once the shoots are about 2 inches tall, move the container to a brighter location, such as a sunny windowsill. Increased light exposure will encourage faster growth and ensure the stems grow strong and upright. Rotate the container every few days to ensure even growth towards the light.
8. Use the Vodka Trick to Keep Stems Short and Sturdy
To prevent your paperwhites from becoming too tall and floppy, you can use a diluted alcohol solution. Once the shoots are a few inches tall, replace the water with a solution of 4-6% alcohol. This can be made by mixing 1 part vodka or gin with 7 parts water. This method helps keep stems shorter and sturdier.
9. Cluster Bulbs for a Fuller, Faster “Instant Bouquet” Look
For a lush, full display, cluster multiple bulbs together in a single container. This not only speeds up the blooming process by creating a micro-environment but also gives the appearance of a ready-made bouquet. Ensure there’s enough room for each bulb to grow without being overcrowded.
10. Rotate and Forget: Low-Effort Care While They Grow
One of the best things about paperwhites is their low-maintenance nature. Once they’re set up in the right conditions, they require very little care. Simply rotate the container every few days to ensure even light exposure and top up the water as needed. Sit back and watch them grow!
11. Fix Common Paperwhite Problems in Minutes
If you notice your paperwhites are drooping, it could be due to insufficient light or overwatering. Move them to a brighter location and adjust the water level. Yellowing leaves often indicate too much water; ensure the bulbs aren’t submerged. If growth seems stunted, try gently cleaning the bulbs and replacing the water.
12. Save or Toss? What to Do With Bulbs After Blooming
After your paperwhites have finished blooming, you can choose to discard the bulbs, as they are often not worth saving for future blooms indoors. However, if you have a garden, you can attempt to plant them outside in the spring. Allow the foliage to die back naturally if you plan to replant, as this process helps store energy in the bulb for future growth.
