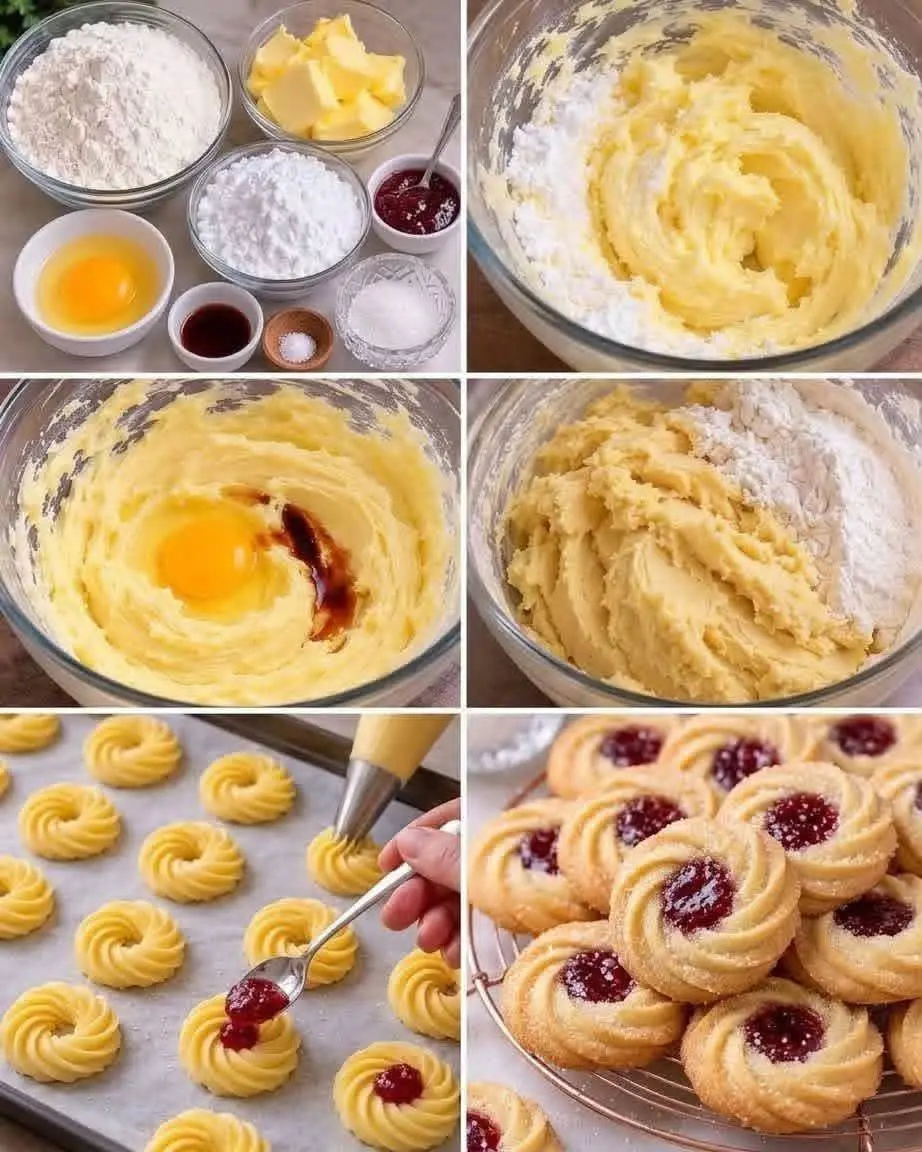
If you’re looking for a beautiful, delicious, and easy homemade cookie recipe, these Delightful Piped Jam Cookies are exactly what you need!
These gorgeous little butter cookies feature delicate swirls, lightly golden edges, and sweet, fruity jam centers. They’re wonderfully tender, rich, and buttery, with a texture that practically melts in your mouth.
The combination of buttery vanilla cookies and vibrant raspberry or strawberry jam creates an irresistible treat that’s perfect for afternoon tea, holidays, family gatherings, or simply enjoying with your favorite cup of coffee.
Best of all, you can make these elegant bakery-style cookies at home with just a handful of everyday ingredients.
Whether you’re an experienced baker or trying piped cookies for the first time, this easy step-by-step recipe will help you create beautiful cookies that look just as delicious as they taste.
Why You’ll Love These Piped Jam Cookies
There are so many reasons these homemade jam cookies deserve a place in your recipe collection.
- Rich buttery flavor: Made with real butter for a delicate, melt-in-your-mouth texture.
- Beautiful appearance: The piped rosette shapes make these cookies look like they came straight from a bakery.
- Sweet fruity centers: Every cookie has a delicious dollop of jam that complements the buttery dough.
- Simple ingredients: You only need a few basic baking staples.
- Perfect for special occasions: Ideal for Christmas, birthdays, tea parties, and homemade gifts.
- Customizable: Use your favorite jam flavors to create different varieties.
- Easy to prepare ahead: The dough can be prepared in advance, and baked
- cookies store well.
These little treats are proof that you don’t need complicated techniques or expensive ingredients to create something special.
Recipe Overview
- Prep Time: 20 minutes
- Chilling Time: 15–20 minutes (optional but recommended)
- Baking Time: 10–12 minutes per batch
- Total Time: Approximately 45–55 minutes, excluding additional batches
- Servings: Approximately 24–30 cookies
- Difficulty: Easy to Intermediate
- Cooking Method: Oven Baking
Ingredients for Delightful Piped Jam Cookies
To make these delicious cookies, you’ll need the following ingredients.
For the Cookie Dough
- 1 cup (225 g) unsalted butter, softened
- 3/4 cup (90 g) powdered sugar (confectioners’ sugar)
- 1 large egg, or 2 egg yolks
- 1 teaspoon (5 ml) vanilla extract
- 1/4 teaspoon salt
- 2 cups (240 g) all-purpose flour
For the Jam Filling
- 1/3 cup (approximately 100 g) raspberry jam, strawberry jam, or your favorite fruit preserve
Optional Garnish
- Powdered sugar for dusting
- Finely chopped pistachios
- Melted dark or white chocolate
- A little lemon zest for extra flavor
Ingredient Tip: Choose a thick, smooth jam for the centers. Runny jam may spread too much during baking, while jams with large fruit pieces can be harder to spoon neatly into the cookie swirls.
How to Make Delightful Piped Jam Cookies
Follow these simple instructions to create perfectly shaped, tender butter cookies with delicious jam centers.
Step 1: Prepare the Butter and Sugar
Begin by placing the softened unsalted butter into a large mixing bowl.
Add the powdered sugar.
Using an electric hand mixer or stand mixer, beat the butter and
sugar together on medium speed for approximately 2–3 minutes.
Continue mixing until the mixture becomes pale, creamy, and fluffy.
This step helps create the delicate texture that makes these cookies so irresistible.
Baking Tip: Your butter should be soft enough to press with your finger but should not be melted. Overly warm butter can cause the cookies to spread and lose their beautiful piped shape.
Step 2: Add the Egg and Vanilla
Once the butter mixture is smooth and creamy, add the egg and vanilla extract.
Beat until everything is thoroughly combined.
If using two egg yolks instead of one whole egg, add them one at a time while mixing.
The mixture should become smooth, creamy, and slightly fluffy.
Scrape down the sides of the bowl with a spatula to ensure all the ingredients are evenly incorporated.
Step 3: Incorporate the Flour and Salt
In a separate bowl, whisk together the all-purpose flour and salt.
Gradually add the dry ingredients to the butter mixture.
Mix on low speed or gently fold with a spatula until a smooth, soft dough forms.
Avoid overmixing because too much mixing can make the finished cookies tougher.
The dough should be soft enough to pipe through a large star nozzle while still being firm enough to hold its shape.
If the mixture seems too stiff, allow it to soften briefly at room temperature. Avoid adding unnecessary liquid, as this may cause excessive spreading during baking.
Step 4: Prepare the Baking Sheet
Preheat your oven to
350°F (175°C).
Line one or two baking sheets with parchment paper.
Prepare a sturdy piping bag fitted with a large open-star nozzle, such as a Wilton 1M or 2D tip.
Transfer the cookie dough into the piping bag.
For easier piping, fill the bag only halfway at first.
This gives you better control over the pressure and helps create neat, consistent shapes.
Step 5: Pipe the Cookie Rosettes
Hold the piping bag vertically above the prepared baking sheet.
Apply steady pressure while piping the dough into small circular swirls or rosettes.
Try to keep each cookie approximately 2 inches wide.
Leave about 1 inch of space between the cookies to allow for slight spreading during baking.
Continue piping until all the dough has been used.
The beautiful ridges created by the star nozzle will give your cookies their signature bakery-style appearance.
Helpful Tip: If the dough is difficult to pipe, check that your butter was properly softened and that your piping nozzle is large enough.
Step 6: Create the Jam Centers
Using the back of a small spoon, a rounded measuring spoon, or your fingertip, gently make a shallow indentation in the center of each piped cookie.
Be careful not to flatten or damage the delicate ridges.
Next, spoon approximately 1/2 teaspoon of jam into each indentation.
Raspberry jam gives the cookies a beautiful deep-red center and a slightly tangy flavor.
Strawberry jam creates a sweeter, fruitier taste.
You can also experiment with apricot, cherry, or blueberry
preserves.
Avoid overfilling the centers, as the jam may bubble and spill over during baking.
Step 7: Chill the Cookies for Better Shape
For cookies with more defined swirls, place the prepared baking sheet in the refrigerator for approximately 15–20 minutes before baking.
This optional step helps firm up the butter and can reduce excessive spreading.
Chilling is especially helpful if your kitchen is warm or the dough softened considerably during piping.
Step 8: Bake Until Lightly Golden
Place the baking sheet in the preheated oven.
Bake for approximately 10–12 minutes, or until the edges and bottoms are just beginning to turn lightly golden.
Depending on the size and thickness of your cookies, they may require an additional minute or two.
The centers should appear set, and the jam may bubble slightly.
Avoid overbaking, as these cookies are meant to have a tender texture rather than a hard, crunchy consistency.
Step 9: Cool Completely
Remove the baking sheet from the oven.
Allow the cookies to rest on the baking sheet for approximately 5 minutes.
Freshly baked butter cookies are delicate, so moving them immediately may cause them to break.
Once slightly firm, carefully transfer them to a wire cooling rack.
Let them cool completely before serving or storing.
The jam will thicken as it cools.
Step 10: Serve and Enjoy
Once the cookies have cooled, arrange them on a beautiful serving plate.
If desired, dust the edges lightly with powdered sugar for an elegant finishing touch.
Serve with a warm
